Dell Precision Tower 5810
(Spare: Dell OptiPlex 3060, being used for the PLC system)
Turn-Off/On Procedure
Turning Off
- Stop and close the following VIs.
- Cryo Control Panel — Click the "Stop All Subsys" button and then the "Stop This" button.
- BOS+EOS Handler — Follow the detailed procedure written below.
- Shut down the OS.
- Ask the SpinQuest network admin to shut down the following SpinQuest servers.
- e1039scrun — Use SSH and the "poweroff" command
- e906-gat1, e1039gat1 — Use SSH and "poweroff"
- e906-db1 — Use SSH and "poweroff"
- SeaQuestDsk0 (/data2) — Long-press the hardware power button until the power goes off
Turning On
- Make sure that the following Sea/SpinQuest servers are up and running. If not, contact the network admin or boot them up if allowed.
- SeaQuestDsk0, e906-db1 — Wait until SeaQuestDsk0 becomes up.
- e906-gat1, e1039gat1
- e1039scrun
- Make sure that the slow-control rack and the magnet rack are up and running.
- Boot up the OS.
- Login as "e1039daq". Only the UVA members know the password.
- Click "SX Virtual Link" in the taskbar to open it. It connects to all remote USB devices automatically.
- Start the following VIs.
- BOS+EOS Handler — Follow the detailed procedure written below.
- Cryo Control Panel — Double-click "CCP_Main.vi" on the desktop and click the VI "Run" icon.
Trouble Shooting
- VI shows an error about "/data2".
- "/data2" does not get mounted if it is not online when booting up the OS. There is a way of mounting it manually. But for now please reboot the OS.
- VI shows an error about COM/Ethernet/USB communication with a device.
- Make sure that the device is ON.
- Open and close "Instacal" (whose icon is in the taskbar) if the device is MCC E-TC.
- Close, open and run the VI. If this does not help, try the next step.
- Close all VIs and LabVIEW itself. Then open and run all VIs. It is because some devices are recognized by LabVIEW only when LabVIEW starts.
BOS+EOS Handler
A program to detect the BOS & EOS signals to update the BOS, EOS & SPILLCOUNTER variables on EPICS.
Turning Off
- Click the "STOP" button. It might show an error, but it is fine for now.
- Close the VI file, by clicking the right-top Close button of the window. Do not save any change, if asked.
Turning On
- Make sure that the NIM bin with the gate generator for BOS/EOS is on. It is in the bottom of the right most rack.
- Double-click "bos_eos_mostreal_atBOS_sid_saved.vi" (which is a shortcut) on the desktop.
- Click the VI "Start" icon.
- Right-click "monitor_spill.ps1" on the desktop and click "Run with PowerShell". It pops up a small text terminal.
- Wait for one minute at max to confirm that the text terminal shows new records of BOS, EOS and SPILLCOUNTER.
Communication with Slow Control Devices
All devices in the slow control rack are connected with the target computer through the interface converters. The hardware configuration is explained in README.md, note_converter.md, etc. in this repository:
https://github.com/uva-spin/Temperature-Pressure-VIs
All virtual USB devices are usually disconnected. You have to connect/disconnect each device before/after you use it via "SX Virtual Link". You can click the icon in the taskbar to bring up the user interface like this.
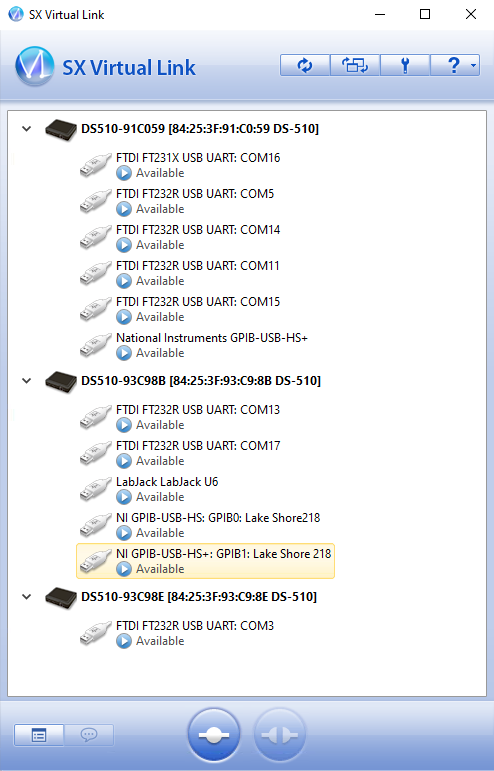
Environmental Variables for EPICS
The target computer has to communicate with the EPICS server to set BOS, EOS and SPILLCOUNTER. We follow this procedure.
- Search for "env" in the search box.
- Bring up "Edit the system environment variables".
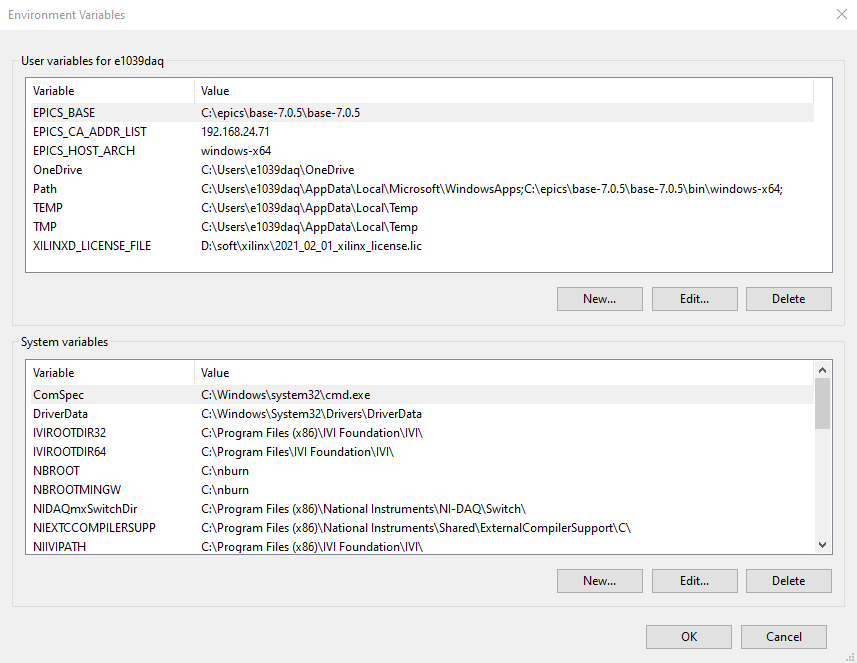
- Click the "Environment Variables..." button.
- Add or modify the EPICS variables; EPICS_BASE, EPICS_CA_ADDR_HOST and EPICS_HOST_ARCH. Example.
- Reboot.
Misc Settings
The following settings were made, as instructed in another page.
- Git repository
- NFS mount
- Disabling automatic Windows update
Change in Target Computer Setup
kind of a log-book.
| Date | Status/Update/Modification | User's name | Additional notes |
|---|---|---|---|
| Change EPICS_CA_ADDR_HOST from 192.168.24.71 to 192.168.24.72 | Kenichi | |